
A repair mistake can get worse with one more attempt. If your DIY phone repair has gone wrong, stop before forcing parts into place or repeatedly restarting the phone. A black display, unusual heat, a swollen battery, or moisture are reasons to stop handling it and seek professional assessment. A repair may affect warranty coverage, particularly if it causes damage.
It’s understandable to try a hands-on fix, especially when a cracked screen or failing battery interrupts your day. The next step is to work out what changed during the repair without guessing at connectors or replacement parts. A loose connection may be the problem, but reopening the device without preparation can cause further damage.
This article explains when to stop and seek professional repair, how replacement parts and disturbed seals can affect your phone, and what to consider before attempting another fix. You’ll also find practical steps for common problems after reassembly, helping you decide whether to troubleshoot further or get expert help.
Key Takeaways
- Stop troubleshooting if a repair leaves the phone unusually hot, swollen, wet, or unresponsive; further handling can make the damage worse.
- Match replacement parts to your exact phone model, and don’t force a component that won’t fit properly.
- Opening and reassembling a phone can compromise its water resistance, so treat it with extra care around moisture afterward.
- Research the specific fault, repair steps, and required tools before opening the device again.
- Know which symptoms are safer to leave to a repair professional, especially when connectors, battery damage, or possible water exposure are involved.
1. Seek professional repair assistance when unsure
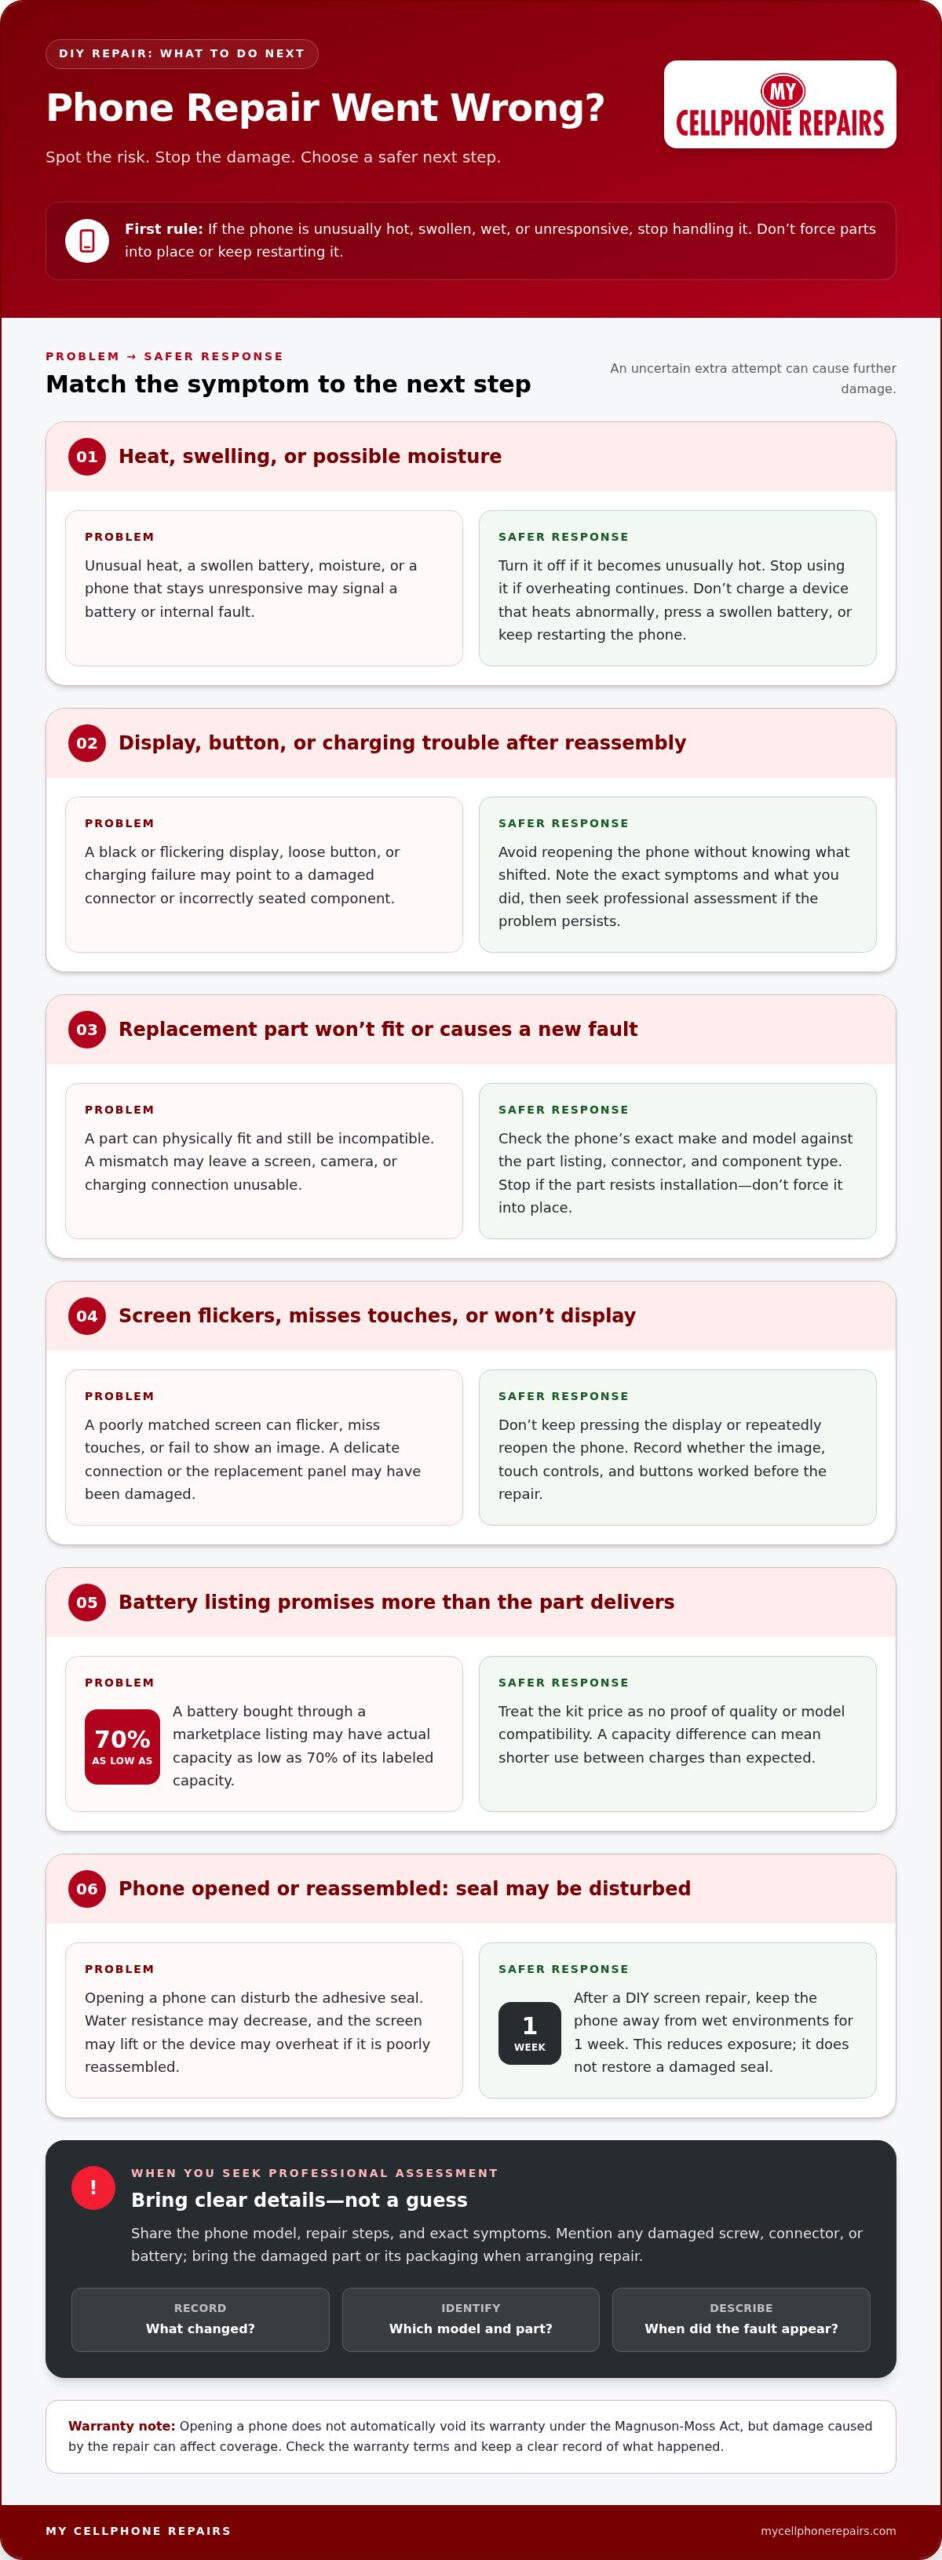
Stop if your iPhone or Android phone behaves differently after reassembly. A black or flickering display, a loose button, or charging failure may point to a damaged connector or incorrectly seated component. Reopening the phone without knowing what shifted can cause more damage. Note the symptoms and the steps you took before seeking professional assessment.
Turn off the phone if it becomes unusually hot, especially after you’ve closed apps and removed its case. If it continues to overheat, stop using it and seek professional help. Heat can signal a battery or internal fault, and repeated restarts won’t fix a damaged component. Don’t press a swollen battery or continue charging a device that heats abnormally.
Opening your own phone doesn’t automatically void its warranty under the Magnuson-Moss Act, but damage caused by the repair can affect coverage. Check the warranty terms and keep a clear record of what happened. If a screw, connector, or battery was damaged during the attempt, describe that specific issue rather than guessing at the cause.
DIY costs include the tools, adhesive, replacement gasket, parts, and any suitable heat source. A battery repair may require these items, while a screen repair can need different tools and components. A professional repair quote depends on the phone model, fault, parts, and work required, and the price is given after a quote request. Compare the full repair scope, not just the part cost.
Choose professional repair when you lack the correct tools, can’t identify the damaged component, or risk disturbing a battery or delicate connector. Ask a nearby repair shop like Gadgets Repair what they found, which parts need replacement, and whether they test the phone’s functions after repair. Also ask how the repair affects water resistance and what coverage applies to the work.
Consider recycling or replacing a phone if it has repeated faults, extensive damage, or repair needs that outweigh its remaining usefulness. Think about whether it can reliably handle essential tasks and whether a repair would address the main problem. If it can’t, prepare it for responsible electronics recycling rather than leaving a damaged device unused.
When deciding what to do after a DIY phone repair goes wrong, stop before taking another uncertain step. Professional help is the right next move for persistent overheating, suspected water damage, broken connectors, or a battery that appears bent or punctured. Share the phone model, repair steps, and exact symptoms so the assessment can focus on the likely fault.
2. Risks of low-quality replacement parts
A replacement part can fit the phone physically and still fail to work properly. Before buying, identify the exact make and model in the phone’s settings or on its casing. Compare it with the part listing, including the connector and component type. Don’t rely on a product title that names only a broad phone family. A mismatch can leave a screen, camera, or charging connection unusable.
Low-quality parts can cause problems that look like new phone faults. A poorly matched screen may flicker, miss touches, or fail to display an image. An incompatible connector can prevent charging or strain the phone’s board if forced into place. A battery replacement can also affect nearby wireless charging coils or feedback motors. Stop if a part resists installation; pressure can turn a compatibility issue into physical damage.
Screen replacement needs particular care because the display connects to delicate internal components. A cracked panel may leave glass fragments, and a replacement screen can be damaged during removal or fitting. If touch response changes after installation, don’t keep pressing the display or repeatedly reopen the phone. Record whether the image, touch controls, and buttons worked before the repair. Those details help distinguish a faulty part from a loose or damaged connection.
Battery listings also deserve scrutiny. A battery bought through a marketplace listing may have an actual capacity as low as 70% of its labeled capacity. That difference can mean shorter use between charges than expected. Treat the kit price as no proof of component quality or model compatibility.
If a DIY attempt leaves a cracked screen, damaged charging port, or broken connector, stop using force and avoid improvising another replacement. Keep the phone switched off if the damage affects safe operation, and bring the damaged part or its packaging when arranging repair. Describe what stopped working and whether the fault appeared before or after you fitted the part.
Choose professional assessment if the replacement doesn’t match the model, won’t seat without pressure, or creates new faults. A repair technician can inspect the connection, part fit, and surrounding components before further reassembly. For a damaged display, consider professional screen repair instead of risking another screen removal. The right next step depends on whether the fault lies in the replacement part, its connection, or damage caused during installation.
3. Loss of water resistance after opening a phone
Opening a phone can disturb the adhesive seal that helps keep moisture out. If the phone is poorly reassembled, water resistance may decrease, and the screen may lift or the device may overheat. A phone that worked before a screen or battery repair can face new risks once the casing is closed. Don’t assume its original water resistance remains unchanged.
After a DIY screen repair, keep the phone away from wet environments for 1 week. Avoid using it near sinks, rain, or damp surfaces during that period. This precaution doesn’t restore a damaged seal; it reduces exposure while you monitor the repair. Don’t deliberately splash or submerge the phone to test whether the screen adhesive held.
Check the phone’s exterior before using it normally. Look for a screen edge that sits higher than before, uneven gaps around the case, or adhesive that has squeezed out. A lifted edge can mean the display hasn’t seated properly. Don’t press hard on it or add household glue, since pressure may damage the display or components beneath it.
Moisture can reach internal parts through gaps created during reassembly. It may affect the battery, charging connection, and other components even if the phone initially turns on. If the device gets wet, don’t power it on or plug it in until it’s thoroughly dry. If moisture may have entered the phone, stop using it and arrange professional assessment rather than reopening it without a clear repair guide.
Use the repair guide for the exact phone model, not instructions for a similar-looking device. Models can differ in screen fit, adhesive placement, and internal layout. Follow each reassembly step carefully, and check that the display sits evenly before treating the phone as sealed. A new adhesive strip can help secure parts, but applying it carefully doesn’t prove that water resistance has been restored.
Watch for changes after repair. A lifting screen, unexpected heat, or charging problems are reasons to stop using the phone and seek help. If moisture may have entered, a professional can assess the device and identify affected parts. My Cellphone Repairs handles water damage repairs when moisture may have reached a phone’s internals. Don’t rely on its former water resistance after opening it.
4. Research the phone problem and repair steps
Before another repair attempt, identify the exact phone model and the fault. Check the device settings if it still turns on, or inspect its back. Some models show identifying details beneath a removable battery. Match the model number to a repair guide, parts list, and tool list. Instructions for a similar-looking phone may show a different internal layout.
Describe the symptom precisely before choosing a fix. For example, record whether the screen went black after reconnecting the display or charging stopped after port work. Note the steps you completed and the components you removed. This helps distinguish a loose connection from a failed replacement part, and keeps you from repeating an attempt that has already caused damage.
Read the full model-specific guide before opening the phone. Check each step, tool, adhesive, and replacement part against your device. Look for clear instructions on component placement and reassembly, not just the removal process. A DIY screen replacement typically takes 1-3 hours, so plan uninterrupted time. Rushing through steps increases the chance of missed screws or misplaced components.
To disconnect a phone battery after a failed repair, follow the guide for the exact model and disconnect power before handling other connectors. If the battery is damaged, swollen, or difficult to access, stop and have a repair professional handle it.
Protect your data before attempting another fix. A disconnected or shorted phone board during repair can result in data loss. If the phone still works, back up important files before opening it again. If it won’t start, avoid repeated power cycles and don’t experiment with connectors while the battery remains connected. Tell the repair technician when the fault began and what you changed.
Research the specific problem, not just a broad phrase such as “phone won’t turn on.” A black screen after reassembly calls for different checks than a phone that starts but has flickering or unresponsive touch. Compare the guide’s symptoms with what you see. If the steps require work you can’t do confidently, stop rather than improvising with tools or replacement parts.
Keep the guide and a written repair log beside the device. Record screw locations, connector positions, and the order of removed components. Separate screws by location because similar-looking fasteners can differ. Before closing the phone, compare your work with the guide’s reassembly steps. A clear record gives the next repair attempt a better starting point and helps a technician assess internal damage.
5. What should I do immediately if a DIY phone repair went wrong?
Stop the repair as soon as the phone shows a new fault. Don’t keep testing it, force a part, or start another repair attempt before identifying the problem. Note what changed, such as a black display after reconnecting the screen or charging failure after port work. Record the components you removed and any parts you replaced. These details help keep the next step focused.
If the screen stays black after reassembly, stop repeatedly restarting the phone. A partly seated display connector may be the cause, but don’t try to reseat it while the battery is connected. Reopening the phone can cause more damage if you can’t safely follow the device-specific steps. Avoid pressing on the display or repeatedly plugging in the phone to test it.
Check the battery without pressing, bending, or puncturing it. A lithium-ion battery damaged during installation can swell or create a fire hazard. If it appears bent, punctured, or swollen, stop handling the phone and arrange professional help. Don’t continue disassembly to reach a connector if doing so means putting pressure on a damaged battery.
If the phone is wet, don’t turn it on or plug it in until it’s thoroughly dry. Powering or charging it while moisture remains inside can add electrical damage. Set aside the repair tools and note when the phone got wet. If you’re unsure whether moisture reached internal components, don’t use a startup test to find out.
Protect your data by avoiding experiments with the phone’s board. A disconnected or shorted board during repair can result in data loss. If the phone still works, back up important files before handling it further. If it won’t start, note whether it showed signs of life before the repair and tell a technician which connectors or components you touched. Don’t keep reconnecting the battery to try to recover files.
Gather the phone, replacement parts, and any screws you removed. Keep small parts together, and write down the model and repair steps. For example, say that the display went black after reassembly rather than only saying the phone is broken. A clear timeline helps distinguish a new fault from the original problem and shows what changed during the repair.
Seek professional assessment if the battery is damaged, moisture may have entered, the screen stays black, or the board may be shorted. Stop before another attempt causes more damage or puts your data at risk. Share your notes and the removed parts with the technician so they can assess the phone’s condition and determine what needs attention.
My Cellphone Repairs: Samsung Phone Repair
My Cellphone Repairs can help when a DIY repair leaves your Samsung phone with a damaged screen, battery, or other hardware issue. Stop further attempts if a connector feels loose, the phone won’t charge, or the display remains unresponsive. Explain what you repaired and describe the symptoms that followed. That gives the technician useful context for assessing the problem.
For Samsung hardware faults, Samsung Phone Repair is a professional next step at My Cellphone Repairs. The company also handles iPhone Screen Repair, MacBook Repair, and Battery Replacement. Choose professional help when you can’t identify the cause or another repair attempt could further damage the device.
Contact My Cellphone Repairs to discuss your repair needs.
Choose the next step with care
A repair setback doesn’t mean you need to keep taking the phone apart. Pause, protect the device from further damage, and decide whether another attempt fits your skills and tools. If you’re weighing what to do after a DIY phone repair goes wrong, focus on the visible problem and avoid guessing at hidden faults.
Before arranging help, write down what you repaired, what changed, and whether the phone still powers on. Share those details when you contact My Cellphone Repairs. Clear information helps start a focused conversation about your phone’s condition and the repair it may need.
My Cellphone Repairs handles phone and computer repairs, including Samsung, iPhone, and MacBook repairs. Take the next step at a pace that feels right for you: contact My Cellphone Repairs about your repair. A careful decision now can help you move forward with confidence.
Frequently Asked Questions
Is it illegal or warranty-voiding to open my own phone?
Opening your own phone isn’t automatically illegal or enough by itself to void warranty protection in the United States. Opening a device does not necessarily end warranty coverage, though damage caused during a repair may affect a related claim. Keep the original repair receipts and note what you changed. If another fault appears, distinguish it from the problem that led you to open the phone.
Should I try DIY on a phone that won’t turn on?
Don’t start another DIY repair until you know why the phone won’t turn on. A phone that shuts off during a screen repair may have a different fault from one that stopped powering on beforehand. Write down when the failure began and what you handled. If the phone has a damaged battery, moisture exposure, or signs of heat, leave it off and seek professional assessment instead of opening it further.
What should I do if a phone battery is swollen, punctured, or overheating?
Stop using the phone, and don’t charge, press, bend, or puncture the battery. A damaged lithium-ion battery can swell, and bending or puncturing it can create a fire hazard. If the phone is unusually hot, stop troubleshooting and avoid further handling. Don’t attempt to remove a swollen battery yourself. Tell a repair professional whether the battery was damaged during installation or began swelling before the repair.
Can I turn on or charge a phone after a repair mistake?
Only power on a device if there’s no known moisture or battery damage and no sign of a short. A wet phone must remain off and unplugged until thoroughly dry. If the display is black after reassembly, avoid repeated restart attempts. Note the symptoms and repair steps instead. Powering a device with moisture or damaged internal components can complicate diagnosis and may cause additional damage.
How much does professional phone repair cost in the US after a DIY repair attempt?
The price depends on the case and is given after a quote request. Cost factors include the phone model, the original fault, any damage caused during the DIY attempt, replacement parts, and the labor needed to diagnose and repair the device. Describe the repair attempt accurately, including parts installed and symptoms that followed. That helps the quote reflect the phone’s actual condition rather than the original issue alone.
Does phone insurance or warranty cover damage caused by DIY phone repair?
Manufacturer warranty coverage may be affected if damage results from the DIY repair; opening the phone alone doesn’t automatically cancel it. Insurance coverage depends on the policy’s terms and exclusions. Read the documents for details about accidental damage, unauthorized repairs, and pre-existing faults. When reporting a claim, clearly explain what happened and distinguish the original phone problem from damage that occurred during the repair attempt.
How to recover data from a phone damaged during DIY repair
Stop further repair attempts and seek professional help, especially if the board may have been disconnected or shorted. Explain what happened and ask about professional data recovery.