
A phone should have enough charge for a technician to turn it on and run diagnostic tests. Knowing how to prepare your phone for repair also means backing up your data, protecting personal information, removing physical SIM and memory cards, and deciding how to handle the screen passcode. If you have an iPhone, back it up with iCloud, Finder, or iTunes before any factory reset.
It’s natural to focus on the damage, but a few practical steps can make the handoff smoother. This guide explains how to prepare your phone for repair, including how to protect personal data, handle passcodes and cards, and back up an iPhone. You’ll also learn why charge matters for diagnostics and what to do with accessories and repair notes before bringing in your device.
Key Takeaways
- Back up your data before repair, and use Maintenance mode where available to help conceal personal information.
- Decide how you’ll handle the screen passcode so the phone can be tested without unnecessarily exposing your private details.
- Remove your SIM and memory cards before handing over the phone.
- For an iPhone, make a backup with iCloud, Finder, or iTunes before a factory reset.
- Charge the phone so a technician can power it on and run diagnostic tests.
Using Maintenance mode to conceal personal data
- Back up the device before changing its settings. Save photos, messages, contacts, and other important data using your phone’s backup options. A backup gives you a separate copy if troubleshooting or repair leads to data loss. Confirm that the backup is complete before continuing. If you plan to erase the phone, back it up first.
- Use Maintenance mode if your device offers it. This mode can help conceal personal data while the phone is being serviced. Follow the on-screen setup instructions, and set a lock screen if prompted and one isn’t already active. Before handing over the device to My Cellphone Repairs, confirm that Maintenance mode is on and your normal profile and personal files aren’t visible.
- Handle tracking and device protection deliberately. For smartphones running older or newer operating systems, temporarily turn off device-tracking features before service. Changing security settings may be relevant if a factory reset becomes necessary. Different operating systems use distinct device-protection controls, so follow the specific repair-preparation instructions shown for your particular device.
- Decide whether a factory reset is necessary. A reset is optional, not a required preparation step when bringing your device to My Cellphone Repairs. It erases all data stored on the device, so complete and verify your backup first. Reset paths vary by operating system, so check your device settings or follow the general reset instructions shown on your screen.
- Document the damage and record the serial number. Take clear photos of the phone’s front, back, and damaged areas before service. Add a short note describing each issue, such as a cracked lower corner or a screen that flickers. Record the serial number shown in the device’s settings or on its original packaging, so you can identify the phone in your records.
- Review your preparation before handing over the phone. Leaving the device accessible can expose personal information, while resetting it before backing it up can erase files. Missing damage notes can also make it harder to describe the problem clearly. Check your backup, privacy settings, and repair notes as separate steps.
Before the phone goes in for repair at My Cellphone Repairs, owners should log out of accounts and turn off security features as part of how to prepare phone for repair.
Providing or disabling the screen passcode
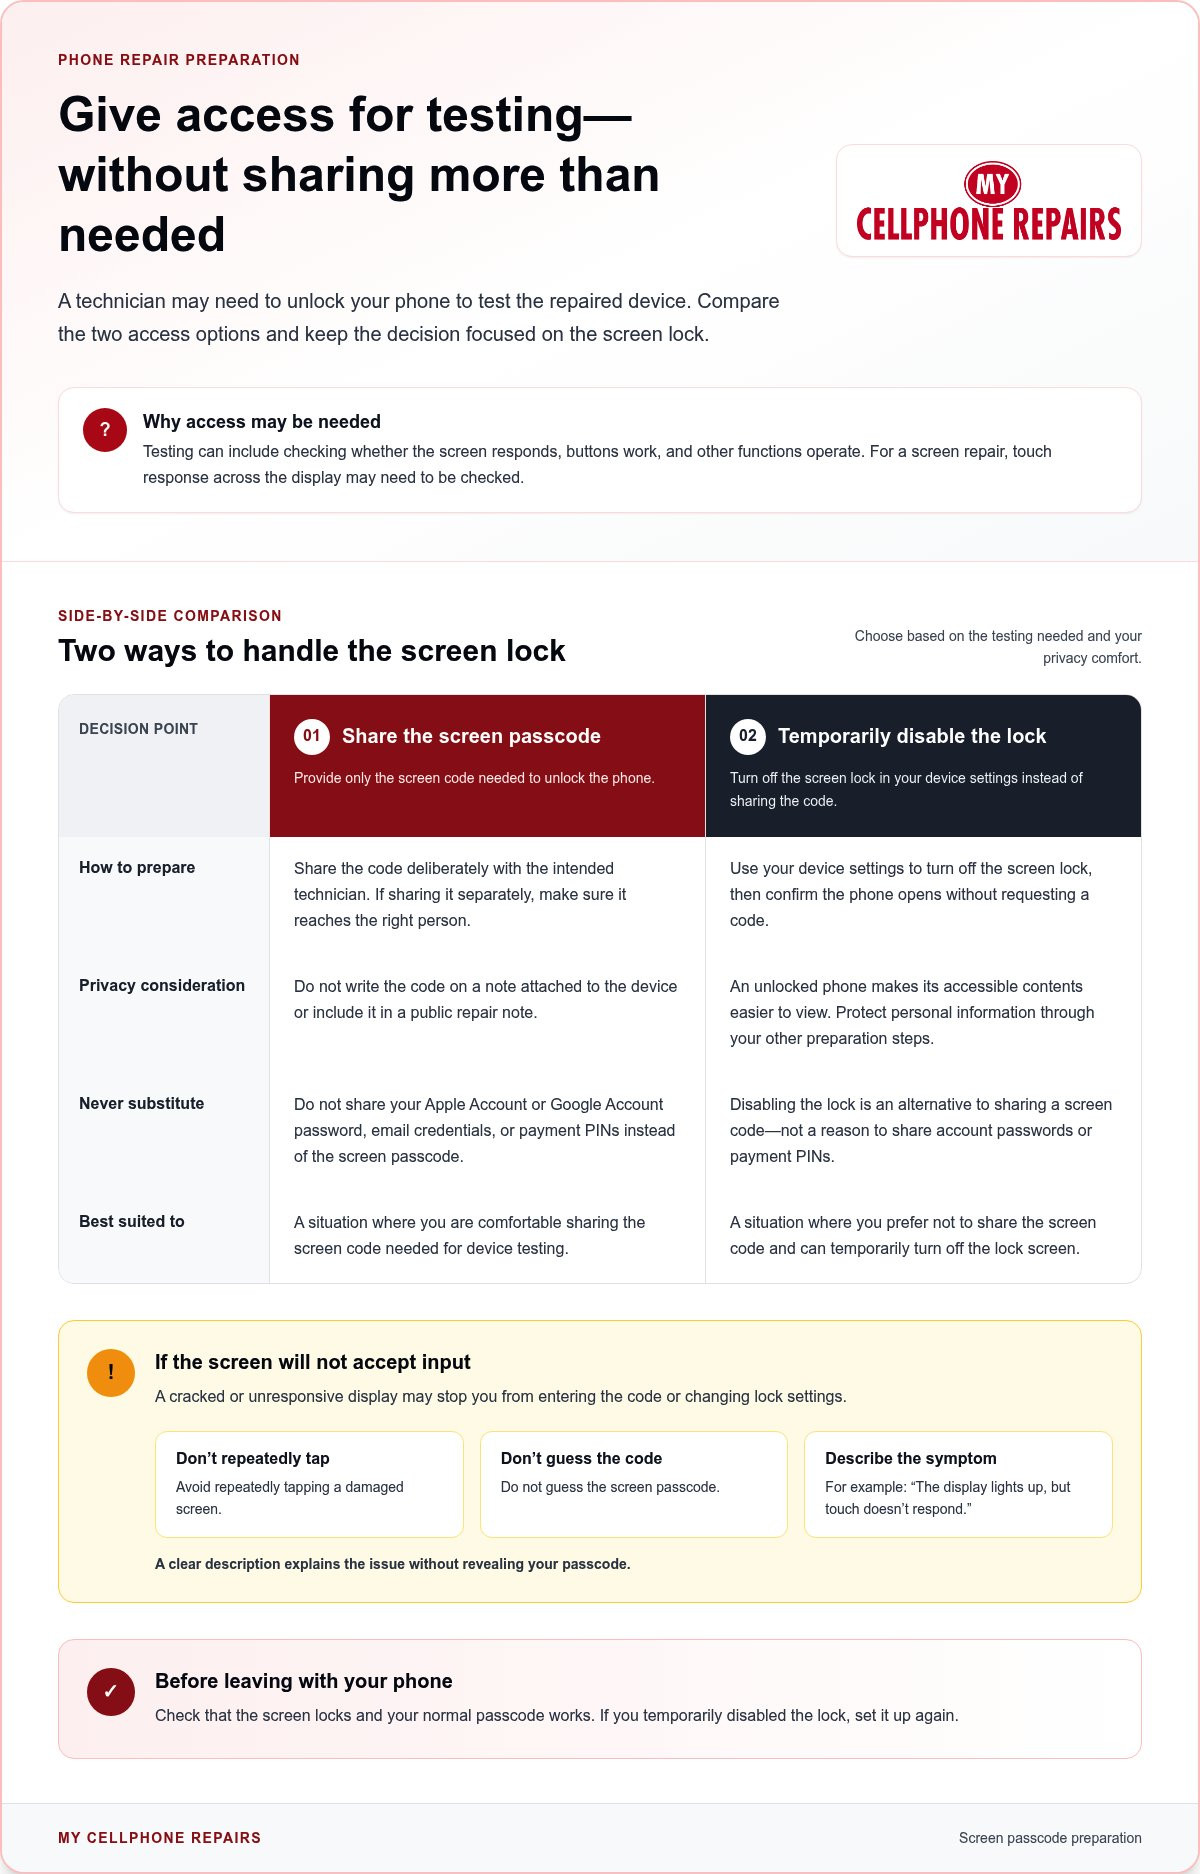
- Decide how the technician can access the phone. A technician may need the screen passcode or password to unlock the device and test it after repair. This can help determine whether the screen responds, buttons work, and other functions operate. You can provide the code or disable the lock screen instead. Choose the option that suits your privacy comfort and the repair task.
- Ask what testing requires before sharing a code. Focus the conversation on the access needed to test the repaired device. For example, a screen repair may require checking touch response across the display. Don’t share account passwords, email credentials, or payment PINs instead of the screen passcode. Those credentials provide access beyond unlocking the phone.
- Consider disabling the lock screen temporarily. You can disable the lock screen instead of sharing a passcode or password with the technician. Use your device’s settings to turn off its screen lock, then confirm the phone opens without requesting the code. An unlocked device makes its accessible contents easier to view, so protect personal information through your other preparation steps.
- If you share the passcode, share it deliberately. Give only the screen code needed to unlock the phone, not your Apple Account or Google Account password. Avoid writing the code on a note attached to the device. If you provide it separately, make sure the intended technician receives it, and don’t include it in a public repair note.
- Plan for a screen that won’t accept input. A cracked or unresponsive display may prevent you from entering the code or changing lock settings. Don’t repeatedly tap a damaged screen or guess the code. Tell the technician what happens, such as “the display lights up, but touch doesn’t respond.” This clearly describes the issue without revealing your passcode.
- Restore your usual lock settings after service. Before leaving with the phone, check that the screen locks and your normal passcode works. If you temporarily disabled the lock, set it up again as part of your return-home routine. If a screen problem prevents secure access, review phone repair help for the next step.
Removing SIM and memory cards
- Check which cards your phone uses. Look for a SIM tray along the phone’s edge and a memory-card slot, if your model has one. Some phones use a removable SIM, while others use an eSIM with no physical card to remove. Remove only cards that are installed, and don’t force open a slot that isn’t there.
- Power down before removing a physical card. Turn the phone off using its normal power controls. Find the SIM tray and use the eject tool supplied with the phone, or the method recommended for that model. Press gently until the tray releases. Remove the SIM and any memory card without bending them or unnecessarily touching their contacts.
- Keep the cards separate from the device. Place each removed card in a small container or envelope, then keep it with your belongings. A loose SIM can be difficult to spot on a counter or in a bag. Label the container “SIM” or “memory card” so you know which card belongs in the phone.
- Protect information stored on the cards. SIM and memory cards can contain personal information, and they aren’t needed for most phone repairs. A memory card may hold photos or files, while a SIM supports your mobile service. Removing both keeps them with you during service instead of inside the device.
- Save memory-card files before service if needed. If the card stores photos or documents you need, copy them to a computer or another secure location before handing in the phone. Open a few copied files to confirm they work. Keep the original card safe, and don’t erase it as part of repair preparation.
- Tell the technician if a card is stuck. Don’t pry at a SIM tray with a knife, pin, or other improvised object. A damaged tray can complicate access to the phone. Explain which card is inside and what’s preventing removal, such as a tray that won’t eject or a phone that won’t power on.
- Check your belongings before leaving. Confirm the SIM and memory card are in the container you set aside, not inside the phone case or on the work surface. After repair, insert each card into its correct slot and check that the phone recognizes it. Keep any removed card with you until then.
IPhone backups with iCloud, Finder, or iTunes
Choose a backup method before service: iCloud, Finder, or iTunes. Complete the backup before any factory reset, then confirm it finished.
-
Back Up with iCloud
Open Settings on your iPhone, tap your name, then choose iCloud and iCloud Backup. Select Back Up Now and keep the phone connected to Wi-Fi while the backup runs. Check the last successful backup time on the same screen before moving on. If the process hasn’t finished, don’t assume your latest photos or messages are included.
-
Back Up with Finder
Connect your iPhone to a Mac with a cable, then open Finder. Select the iPhone in the Finder sidebar and choose the option to back up its data to the Mac. Start the backup and leave the device connected until Finder finishes. Check the latest backup details before disconnecting, especially if you plan to erase the iPhone.
-
Back Up with iTunes
Connect your iPhone to a computer with iTunes installed, then open iTunes and select the device. Choose the backup option on the device summary screen and start the process. Keep the iPhone connected until iTunes reports that it’s complete. Check the latest backup entry before relying on it. Disconnecting during the process can leave you without a completed copy.
- Check the backup before resetting. Use your chosen method to confirm a recent completion time or backup record. A backup that started but didn’t finish isn’t ready to rely on. If you have new photos, contacts, or messages, make sure the backup includes those recent changes before erasing anything.
- Keep the backup method consistent. If you used iCloud, check its latest backup status on the iPhone. For Finder or iTunes, reconnect the device to the same Mac or computer and review its backup details. Don’t start a factory reset until you’ve confirmed a completed backup. A factory reset erases data stored on the iPhone, so this check matters.
- Choose based on the tools you have. iCloud backs up through the iPhone’s settings, Finder uses a Mac, and iTunes uses a computer with iTunes. Pick the option you can complete and verify before service. If your iPhone can’t connect to Wi-Fi or a computer, don’t treat an interrupted attempt as a successful backup.
Charging the phone for diagnostics
A charged phone gives a technician the chance to turn it on and run diagnostic tests. Use these steps to make sure the device has enough battery for that basic check.
- Check the battery before you leave. Wake the screen and check the battery indicator. If the charge is low, connect the phone to its charger before setting out. No specific percentage is required; the practical goal is enough charge for the device to start and stay on during initial testing.
- Use a charger and cable that work with your phone. Connect the phone to its usual charging setup, then confirm the screen indicates that charging has begun. If the indicator doesn’t appear, check that the cable is firmly connected at both ends. Try another working outlet or a cable you already use with the device.
- Give the phone time to gain charge. Leave it connected until the battery indicator rises enough for normal use. Check the screen again before unplugging. If the battery stays low, a loose connector, faulty cable, or charging problem may be involved. Note what you observed so you can describe it clearly during intake.
- Don’t rely on a power bank at the last moment. A portable charger can help if you’re away from an outlet, but confirm that the phone is charging. For example, check the battery symbol after connecting the power bank. If the indicator doesn’t change or the phone won’t turn on, tell the technician rather than assuming it received power.
- Keep the charging issue separate from other symptoms. Record whether the phone charges, powers on, or loses charge during ordinary use. A note such as “the screen turns on, but the battery icon doesn’t appear when connected” is clearer than “it won’t work.” Include the cable or charger used if that detail helps explain what happened.
- Bring a relevant accessory only if it needs attention. If the charging cable or adapter is part of the problem, bring that specific accessory with the phone. Otherwise, charge the device beforehand and leave unrelated accessories at home. This keeps the handoff focused on the phone and the issue you’ve noticed.
- Tell the technician if the phone won’t charge. Don’t describe a phone with a dead battery as ready for testing. Explain whether it failed to start, showed no charging indicator, or shut down after connecting to power. These details help the technician understand the phone’s starting condition and assess it during diagnostics.
My Cellphone Repairs: iPhone Screen Repair
My Cellphone Repairs offers iPhone screen repair for cracked or unresponsive displays. To make the handoff clearer, describe the screen symptoms, note any other issues, and have your device ready for assessment. A crack, flickering image, or touch-response problem helps explain what you’re experiencing.
If the phone also has a charging problem, My Cellphone Repairs offers charging port repair. For battery concerns, battery replacement is another available service. Keep your notes specific so the repair team understands the problem, such as a screen that lights up but doesn’t respond to touch.
Contact My Cellphone Repairs to discuss your iPhone screen repair.
Make Your Repair Visit the Next Step
Once your phone is ready, focus on the repair itself. Describe the main issue in plain terms, then mention any other symptom that could help explain what’s happening. A clear handoff helps you focus on the repair decision instead of trying to remember details at the counter. Knowing how to prepare your phone for repair is useful; explaining what changed and what still works adds context to the next step. If you find yourself with screen-free downtime while waiting on a repair, active entertainment centers like galaxyfunpark.com offer indoor attractions such as go-karts and trampolines.
My Cellphone Repairs offers Samsung Phone Repair, iPhone Screen Repair, and MacBook Repair. Choose the service that matches the device and problem you’re bringing in. If you’re ready to discuss a repair, contact My Cellphone Repairs. You can take the next step with your notes in hand and a clearer picture of what your phone needs.
Frequently Asked Questions
What do I need to do before I bring my phone in for repair?
To prepare your phone for repair, make a short intake note with the exact symptoms and when they happen. For example, record whether the screen flickers only while charging or whether the phone shuts down unexpectedly. Bring identification and, if available, the sales receipt. If you have device insurance, review its repair process and keep relevant claim details handy.
What should you back up before sending a phone for repair?
Save information you’d be upset to lose, including personal photos, videos, contacts, messages, and documents. For example, irreplaceable recordings of milestone celebrations or live music from groups like therfactor.com deserve extra care. Also consider app-specific content, such as notes or recordings that may not be stored with your other files. Check that the copy opens from the backup location instead of relying only on a “backup complete” message. Keep account recovery information accessible without storing it beside the phone.
How do you back up an iPhone or Android phone before repair?
On iPhone, use iCloud, Finder, or iTunes, then confirm the backup is complete before service. On Android, open Settings and look for the device’s backup controls. Follow the prompts and review the latest backup status. Menu names can vary by phone model. If you’re unsure whether a specific item, such as a downloaded file, is included, save a separate copy somewhere you can access.
Should you remove the SIM card and memory card before phone repair?
Yes. Safely remove any accessible physical SIM and memory cards, then store them securely rather than loose in a pocket. A SIM supports mobile service, while a memory card may hold files. If your phone uses an eSIM instead of a physical SIM, there’s no card to remove. Keep removed cards separate from accessories going in for service.
How do you protect personal data when giving a phone to a repair shop?
Use Maintenance mode if your phone offers it, and review which accounts remain signed in before handing over the device. Turn off security features that must be disabled for service, but don’t share account passwords or payment PINs. Consider hiding message previews on the lock screen, since a notification can reveal a private message even when the phone is locked.
What should you do before mailing a phone for repair?
Before mailing, document the phone’s condition and record its serial number for your records. Remove loose items, including cards and accessories that don’t need attention. Pack the phone so it stays protected inside the parcel, and keep your own record of the shipment details. Include a concise description of the fault, such as “the camera image is blurry,” rather than a general note like “phone broken.”
What items should you bring or remove when taking a phone in for repair?
Bring the phone and any accessory that’s part of the problem, such as a charging cable that fails to connect. Remove the case and other add-ons so they don’t get separated from your belongings. Bring government-issued identification and a sales receipt if you have one. Keep earbuds, wallets, and unrelated personal items with you rather than leaving them beside the device.
Do phone repair shops require you to disable the passcode or provide account credentials?
A technician may need the screen passcode or password to unlock the phone and test its functions after repair. You can disable the lock screen instead of sharing that code. Account credentials, such as an Apple Account or Google Account password, are different and shouldn’t be treated as a screen passcode. Share only the access information needed for device testing, not unrelated login details.