
A refurbished iPhone can bring over more than your contacts. With Quick Start, transferring data to a refurbished iPhone can move settings, photos, messages, apps, and your home screen directly from your old iPhone. Some apps and photos may continue downloading in the background after setup.
It’s natural to want your new phone ready to use without losing important information. Quick Start makes the move straightforward when your old iPhone is available and working, but preparation helps prevent delays and missing data.
This guide explains what usually transfers, how to prepare both iPhones, and how to check your information before erasing your old device. You’ll also learn what to do if Quick Start stalls, when an iCloud backup can help, and how to move a physical SIM or eSIM. Follow the steps in order, keep both phones nearby and connected to power during the transfer, and confirm your data is ready before relying on the refurbished iPhone as your main device.
Key Takeaways
- Back up your old iPhone and prepare both devices before starting Quick Start.
- Keep the iPhones close together and connected to power while the transfer runs.
- If the refurbished iPhone has already been set up, erase it before following the Quick Start setup steps.
- Confirm your contacts, photos, messages, and important apps work before erasing your old phone.
- Move a physical SIM after transferring data, and keep an eSIM on the old phone until the new connection works.
Moving data between iPhones with Quick Start
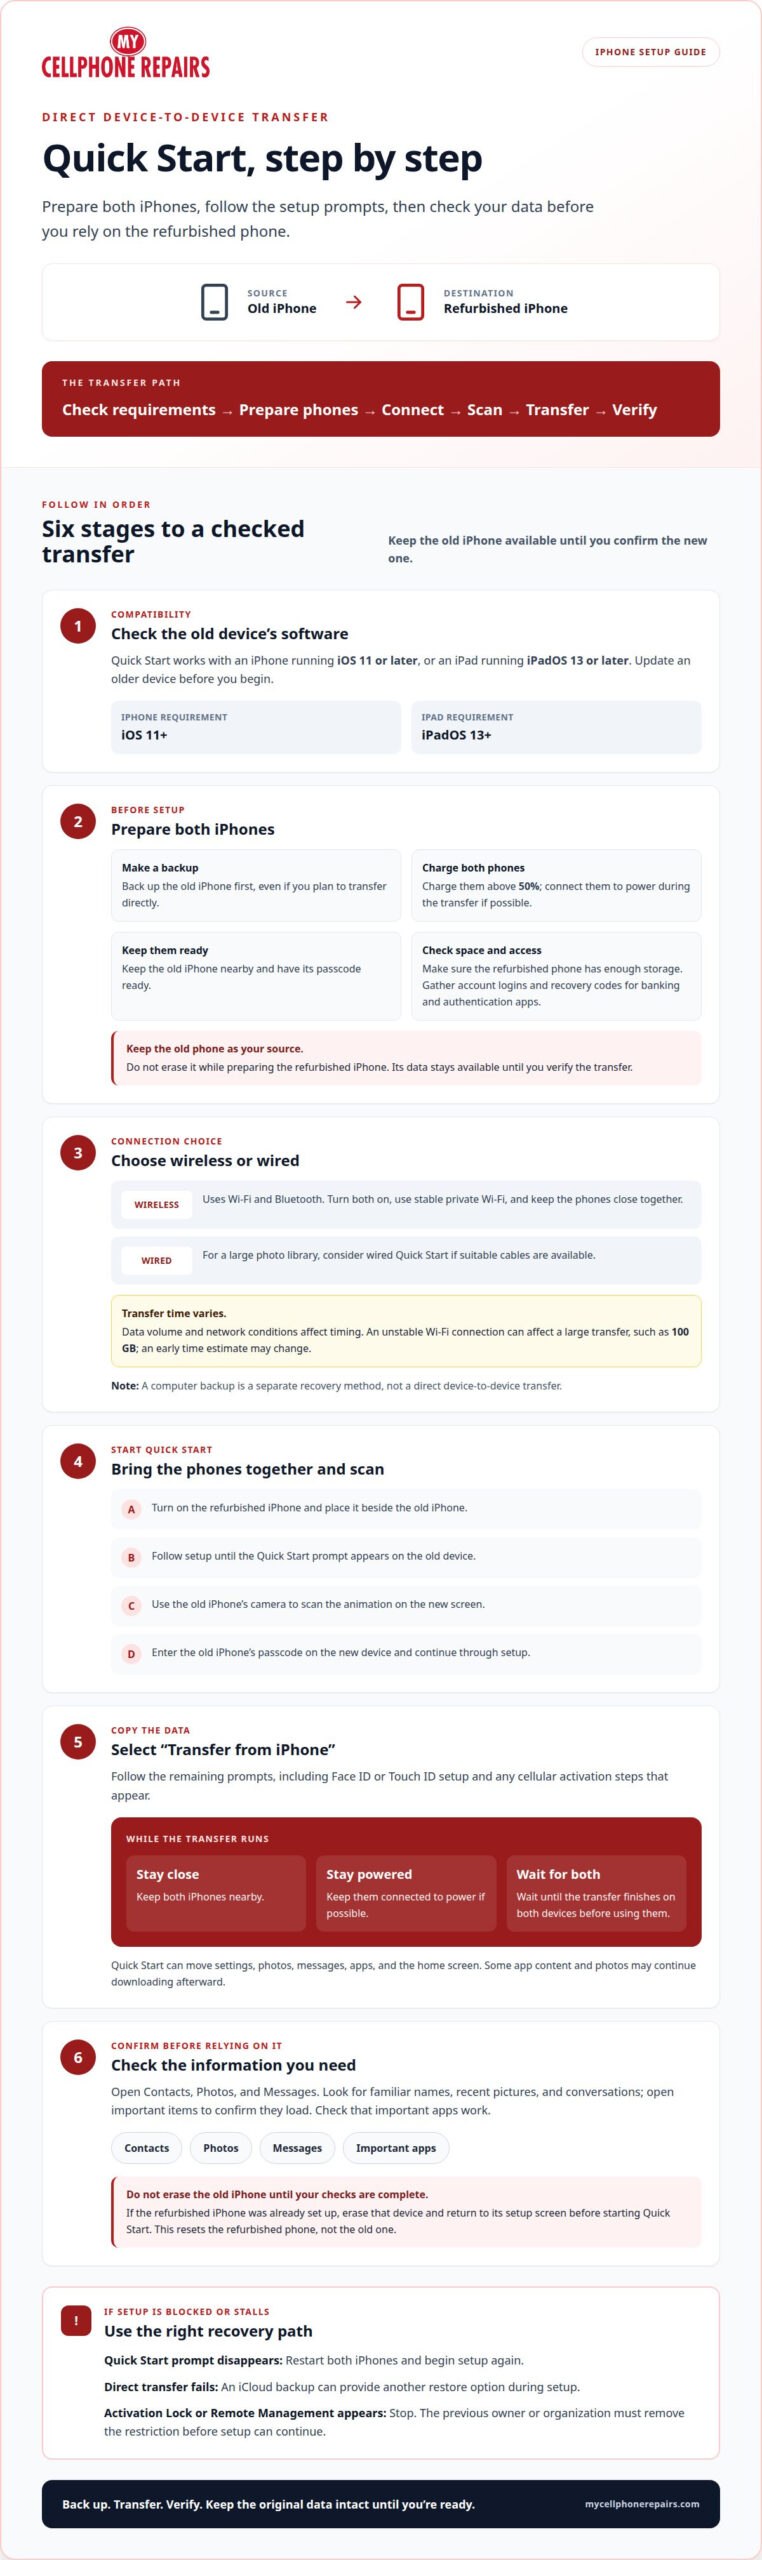
Quick Start copies data directly from an available, working iPhone during setup. Check compatibility, choose a connection method, then follow the setup prompts.
Quick Start flow: Check requirements → Connect devices → Scan animation → Choose transfer → Wait for completion
-
Check Quick Start Requirements
Check the software on the device you’ll transfer from. Quick Start works with an iPhone running iOS 11 or later, or an iPad running iPadOS 13 or later. If the old device has an earlier version, update it before starting.
Back up the old iPhone first, even when transferring directly. Place both devices near each other, connect them to power if possible, and use stable, private Wi-Fi. A large transfer, such as 100 GB, can be affected by unstable Wi-Fi. Keep the old iPhone available throughout setup.
-
Choose a Wireless or Wired Transfer
Choose a connection method before starting setup. Wireless Quick Start uses Wi-Fi and Bluetooth, so turn both on and keep the phones close together. Select the direct transfer option during setup. Avoid moving the phones apart or disconnecting them from power while the data copies.
For a large photo library, consider a wired Quick Start transfer instead of wireless if suitable cables are available. A computer backup is a separate method, not a direct device-to-device transfer. Quick Start timing varies with data volume and network conditions, so don’t treat an early estimate as the final time.
-
Start a Direct Device Transfer
Turn on the refurbished iPhone and place it beside your old iPhone. Follow setup until Quick Start appears on the old device. Use its camera to scan the animation on the new screen. Enter the old iPhone’s passcode on the new device, then continue through setup.
Choose Transfer from iPhone when prompted. Follow the setup prompts, including options to configure Face ID or Touch ID. Complete any cellular activation steps that appear. Keep both phones close and connected to power. Wait for the transfer to finish on both devices before using them.
Quick Start can move settings, photos, messages, apps, and the home screen. Some app content may download afterward. If the prompt disappears, restart both iPhones and begin setup again. If direct transfer fails, an iCloud backup offers another restore option during setup.
For a smoother transfer, keep both iPhones close, charge them when possible, and use stable Wi-Fi. Data volume and network conditions affect transfer time.
Preparing an already-set-up iPhone for transfer
Prepare both phones before starting Quick Start. If the refurbished iPhone has already been set up, erase it first so you can begin setup again.
-
Prepare Both iPhones
Update the old iPhone before making a fresh backup, especially if it runs iOS 15 or earlier. Use the latest iOS version available for that device. An up-to-date backup gives you another recovery option if the direct transfer is interrupted or doesn’t finish as expected.
Charge both phones above 50% before beginning. Keep the old iPhone available, and make sure you know its passcode. Don’t erase the old phone as part of preparing the refurbished one. Its messages, photos, and other data remain your source until you’ve confirmed the new phone has what you need.
-
Prepare Wi-Fi for the Transfer
Choose a stable, private Wi-Fi network before starting. Keep both devices close enough to maintain a reliable connection during setup. Unstable Wi-Fi can disrupt a large data transfer, so avoid starting where the signal drops or the connection repeatedly changes.
Check that Wi-Fi is available on the old iPhone and keep the network accessible during setup. Leave Bluetooth enabled so Quick Start can find the nearby device. If the connection fails, pause and restore a stable network before restarting, rather than repeatedly tapping through the setup prompts.
-
Set Up for Wireless Transfer
Place the phones together on a steady surface and connect them to power if possible. Keep the old iPhone unlocked and nearby so it can respond to Quick Start prompts. Avoid using either phone or carrying one away during the copy, since both need to remain available until the transfer finishes.
Have the old iPhone’s passcode ready. Check that the refurbished phone has enough storage for the data you plan to move. If it has already been set up, erase it and return to the setup screen before starting Quick Start. This resets the refurbished phone, not the old one.
- Save account access details. Before erasing or resetting a device, gather login details for banking and authentication apps, along with any recovery codes. These apps may require you to sign in or reactivate them after setup. Having access information ready helps prevent a successful data copy from blocking access to essential accounts.
- Keep a backup option ready. Make an up-to-date iCloud or computer backup before starting the transfer. Confirm that you can sign in with the Apple Account used on the old iPhone. If Quick Start doesn’t work, the backup offers another way to restore data during setup.
Checking transferred contacts, photos, messages, and app data
Yes. If the refurbished iPhone has already been set up, erase it before using Quick Start. During setup, watch for an Activation Lock prompt requesting the previous owner’s Apple Account or a Remote Management screen. Stop if either appears. The previous owner or organization must remove the restriction before setup can continue.
- Check your core information. Open Contacts, Photos, and Messages on the new iPhone. Look for familiar names, recent pictures, and message conversations. Open an important conversation or photo to confirm it loads correctly. If information is missing, keep the old iPhone intact while you investigate instead of erasing it.
- Open essential apps and follow their prompts. Check banking, authentication, and other apps you rely on. Some may ask you to sign in again or complete a setup prompt. Confirm that you can access your accounts before relying on the new phone. App icons may appear before their downloads finish.
- Allow background downloads to finish. Photos and apps may continue downloading after iPhone setup ends. Connect the new phone to Wi-Fi and power, then check items that seemed incomplete again. A progress indicator or missing thumbnail may mean a download is still running, not that the transfer failed.
- Compare storage needs with available capacity. Check how much space your old iPhone uses and compare it with the refurbished phone’s capacity. For example, a 110 GB collection of photos, apps, and files needs enough room on the new device. A 64 GB iPhone cannot hold a 90 GB photo library without removing or freeing data first.
- Review battery health and software. Open battery settings and inspect the battery health information shown on the refurbished iPhone. Then check for an available iOS update. Installing available software updates can help keep apps and settings current. Battery condition and transfer progress are separate checks.
- Test access before wiping the old phone. Connect to Wi-Fi, place a call if cellular service is active, and open your important apps. Check that contacts, photos, and messages appear as expected. Keep the old iPhone available while using the new one, and confirm that anything still downloading is complete.
- Erase the old iPhone only after verification. Wait 24 to 48 hours after transferring data, then make sure important information and apps work on the refurbished phone. Keeping the old device during this period gives background downloads time to complete and leaves a fallback if a missing item needs attention.
Moving a physical SIM or eSIM
Move your cellular connection separately from your photos, messages, and apps. The method depends on whether your phones use a physical SIM or an eSIM.
- Finish the data transfer before moving a physical SIM. Turn off both iPhones, then remove the SIM card from the old phone’s tray. Insert it into the refurbished iPhone’s SIM tray and turn on the new phone. Check the screen for cellular signal and try a call. The SIM carries cellular service, not the data copied during setup.
- Keep an eSIM active until the new connection works. An eSIM is built into the phone, so there’s no card to move between trays. Follow any cellular setup prompt on the refurbished iPhone. Check its settings for the mobile plan, then confirm the phone connects. Don’t remove or erase the old eSIM before service works on the new device.
- Check the iPhone model before looking for a SIM tray. The U.S. model of iPhone 15 has no physical SIM tray and uses an embedded SIM. If that is your refurbished phone, use the eSIM method instead of searching along the phone’s edges. Check the exact model and its available cellular settings before deciding how to move service.
- Use Move to iOS for an Android-to-iPhone move. Quick Start handles a direct transfer from an old iPhone. Use Move to iOS when moving from an Android device. Follow the setup prompts on both phones and keep them charged during the process. Paid Android apps don’t transfer to iPhone; many free apps may be suggested for download.
- Separate cellular activation from software updates. If the new iPhone prompts you to activate cellular service, complete that step and check for a connection. An iOS update is a separate task, not a SIM transfer method. Keep the phone connected to power during setup, and don’t erase the old device until the new phone connects and your important information is accessible.
Keep the old eSIM in place while you complete cellular setup on the refurbished iPhone. An eSIM should not be removed from the old iPhone until the new phone connection is working. Treat confirmation as the point at which you can move on: check the refurbished iPhone itself, rather than assuming that a completed data transfer also means cellular service is ready. If the connection is not working, leave the old eSIM untouched and continue resolving activation on the new phone. Avoid erasing or otherwise changing the old phone’s cellular setup in the meantime. Once the new phone connects, you can proceed with any remaining setup decisions, keeping your attention on whether the new device is actually connected. This order helps ensure you retain the old eSIM until you have confirmed service on the replacement. Data and cellular service are separate parts of the move, so verify the cellular connection directly before considering the eSIM transfer complete.
Transferring data to a refurbished iPhone
Choose a direct transfer or an iCloud restore based on your backup and setup needs. Keep the old phone available until the important data works on the new iPhone.
A data transfer copies information; it doesn’t set warranty or return terms. A return window of at least 30 days is recommended for a refurbished phone.
To restore an iCloud backup, start setup on the refurbished iPhone and connect to Wi-Fi. Sign in with the same Apple Account used for the backup, then select the latest backup when prompted.
Quick Start can transfer contacts, photos, messages, settings, and apps directly from an available iPhone. If the transfer fails, check Wi-Fi and Bluetooth, bring the phones closer, connect them to power, and restart both devices.
-
Restore an iCloud Backup
Choose the iCloud restore option during setup on the refurbished iPhone. Sign in with the Apple Account and password used on the old device, then select the latest backup. Keep the iPhone connected to Wi-Fi and power while it restores. If setup has already finished, erase the refurbished phone to return to the restore screen.
-
Transfer Contacts, Photos, Messages, and Apps
For a direct iPhone copy, use Quick Start and select Transfer from iPhone during setup. Contacts, photos, messages, settings, apps, and the home screen can transfer from the old device. Some apps and photos may continue downloading afterward. Open key contacts and messages, then check photo thumbnails and app access before erasing the old phone.
If you use a computer backup, choose an encrypted backup when Health and Activity data matters. Restoring that encrypted backup on a Mac requires its backup password. Have the password ready before you begin, and don’t mistake a missing app download for missing contacts or messages.
-
Resolve Transfer Problems
If Quick Start stalls or the new iPhone isn’t found, confirm Wi-Fi and Bluetooth are on. Move the phones closer, connect them to chargers, and restart both devices if needed. A screen showing “1 minute remaining” can stay that way for twenty minutes before finishing, so watch for actual progress.
If the transfer remains unchanged for over an hour, restart both iPhones and try again. If a direct copy fails, restore from an iCloud backup instead. For a large photo library, a wired Quick Start transfer is another option. Keep the old phone intact until contacts, photos, messages, and important apps appear and work.
- Keep cellular service separate from data restoration. Move a physical SIM after the data transfer, then check for cellular signal. For an eSIM, leave the old phone’s plan in place until the new iPhone connects. A backup restore doesn’t replace the SIM move or cellular activation steps.
Need help choosing a replacement device? Explore refurbished iPhone options.
My Cellphone Repairs: Refurbished iPhone Sales
My Cellphone Repairs sells refurbished iPhones for people choosing a replacement device. Once you’ve checked your backup, storage needs, and transfer method, choose an iPhone suited to your everyday use.
Before moving your data, consider how much space your photos, apps, and messages require. The refurbished iPhone needs enough storage for the information you plan to restore. After setup, follow the transfer steps above and keep your old phone until essential data and apps work on the new device.
If you’re ready to discuss a refurbished iPhone, contact My Cellphone Repairs.
Make Your New iPhone Yours
Once your new phone is ready, take time to settle in. Review your account access, set up the features you use every day, and keep important information easy to find. A careful start makes the switch feel complete, not just technically finished.
If you’re still choosing a device, My Cellphone Repairs offers Refurbished iPhone Sales. If a hardware issue needs attention, its repair services include iPhone Screen Repair, Samsung Phone Repair, and MacBook Repair. The right next step depends on whether you need a replacement phone or help with a device you already own.
With a clear plan for transferring data to a refurbished iPhone, you can move forward at your own pace. Contact My Cellphone Repairs for help if you’d like support with your next step.
Frequently Asked Questions
What is usually transferred automatically?
A direct iPhone transfer can copy settings, photos, messages, apps, and your home screen. For example, your familiar app layout may appear on the refurbished phone while individual apps or photos continue downloading. Cellular service is handled separately, so a physical SIM or eSIM may need its own setup. Open important apps after the move, since some may require you to sign in again.
Which Transfer Method Should You Use?
Choose Quick Start if your old iPhone is available and working. Choose an iCloud backup if a direct transfer fails or you already have a recent backup. A Mac or PC backup is another option, especially if you need an encrypted backup for Health and Activity data. Your choice depends on which device or backup you can access and whether the refurbished iPhone has enough storage.
How do I transfer data to a refurbished iPhone during setup?
Start from the refurbished iPhone’s setup screen and connect it to Wi-Fi. Choose Quick Start for a direct iPhone transfer, or select the restore option if using an iCloud or computer backup. Keep the relevant account login and backup details handy. If the phone has already completed setup, erase it to return to the setup screen, then choose your preferred transfer method.
Can I transfer data from Android to a refurbished iPhone?
Yes. Use Move to iOS during the refurbished iPhone’s setup instead of Quick Start, which transfers directly from an old iPhone. Follow the prompts on both phones and keep them available while the migration runs. Paid Android apps don’t transfer to iPhone, though many free apps may be suggested for download. After setup, locate any paid apps you still need.
How to transfer data to a refurbished iPhone from a Mac or PC backup
Restore the Mac or PC backup during the refurbished iPhone’s setup, following the prompts. A Mac backup can be made with Finder, and a Windows backup with the available software. An encrypted computer backup is required to transfer Health and Activity data.
Get it fixed at My Cellphone Repairs: most repairs are done the same day. Walk in or book online.
Book NowPhone frozen or acting up? See our step-by-step restart & reset guides →
Our locations
- Towson Mall825 Dulaney Valley Rd, Second Level, Towson, MD 21204
(410) 828-4404 - Grand Rapids3077 28th St SE, Grand Rapids, MI 49512
(616) 799-6996 - PG Plaza Mall (Hyattsville)3500 East-West Hwy, Mall at Prince George's, Target Entrance, Hyattsville, MD 20782
(301) 559-1105 - Bowie Town Center15630 Emerald Way, Bowie, MD 20716
(240) 614-3600 - Capital City Mall (Camp Hill / Harrisburg area)3604 Capital City Mall Dr, Camp Hill, PA 17011
(717) 919-7868 - Cumberland Mall (Vineland)3849 S Delsea Dr, next to Boost Mobile, Dick's Sporting Goods entrance, Vineland, NJ 08360
(856) 765-5049 - Mondawmin Mall2401 Liberty Heights Ave, Lower Level, Baltimore, MD 21215
(443) 826-7711 - Baltimore Inner Harbor100 East Pratt St, Suite 101, Baltimore, MD 21202
(443) 838-8989 - St Charles Mall (Waldorf)11110 Mall Cir, Waldorf, MD 20603
(301) 645-7755 - Alexandria7650 Richmond Hwy, Alexandria, VA 22306
(703) 341-6789