
How much space will your refurbished iPhone have for photos, apps, and updates? When setting up a new refurbished iPhone, first check its storage in Settings and make sure it’s erased and ready for your Apple ID. These checks can help you catch setup issues before transferring your data.
A pre-owned iPhone should not contain the previous owner’s data or remain linked to their Apple ID through Activation Lock. If setup asks for someone else’s Apple ID, stop and resolve the lock before continuing. Inspect the screen, casing, buttons, and ports, then check that the phone can connect to your carrier. If it won’t activate, a carrier lock or blacklist may be involved.
Next, secure the iPhone with a passcode and Face ID or Touch ID, then choose how to transfer your information. This guide covers storage, Activation Lock, carrier restrictions, and blacklisting. It also compares Quick Start, Android transfer, and computer backups to help you choose a method that suits your old device.
Key Takeaways
- Check available storage in Settings before choosing what to transfer or keep on your iPhone.
- Make sure the previous owner’s Apple ID and Activation Lock are removed before continuing setup.
- Choose Quick Start, an Android transfer, or a computer backup based on the phone you’re moving from.
- Set a passcode and available biometric unlock, then confirm the phone can connect to your carrier.
- Learn how carrier locks and blacklisting can affect activation before relying on the phone for calls and mobile data.
How do I set up a refurbished iPhone?
Inspect the iPhone, erase any previous data and settings, then choose a transfer method or restore a backup. Finish by signing in with your account credentials and installing an available operating system update.
-
Inspect the Phone’s Condition
Examine the screen, casing, buttons, and ports before setting up a new refurbished iPhone. Look for cracks, dents, loose buttons, or signs of damage around the charging port. If the device won’t charge, contact My Cellphone Repairs for assistance. After setup, open Settings to check battery health. Models running recent software versions can show battery health and replacement recommendations. On newer software releases, find it under Settings, Battery, and Battery Health & Charging. Follow any replacement recommendation shown for the device.
Warranty coverage and return terms depend on the seller’s written policy. Review the terms before buying and keep your receipt.
-
Erase Previous Data and Settings
Erase any previous owner’s data and settings before treating the smartphone as your own. If it’s already at the setup screen, continue. If it opens to someone else’s Home Screen, ask the seller to erase it and remove it from their account. Deleting individual apps or photos is not a substitute for a full erase, which gives you a clean start and helps prevent old settings or personal data from carrying over.
If a previous owner’s account ID appears during setup, stop rather than entering your own credentials. The prompt means the account still affects access, so resolve any security lock before transferring data.
-
Transfer or Restore Your Data
Choose a method based on your old device. For a device backup, use your computer’s management software on a compatible computer system. Select the backup you want when prompted to ensure a seamless transition to your new hardware.
To move data from Android, choose the migration tool during device setup and follow the prompts. The transfer screen may pause before the smartphone restarts, so don’t interrupt it just because progress appears stuck. Keep both devices available until the transfer finishes.
-
Set Up Your Account and Update Software
During setup, sign in with your account or follow the prompts to create one. Use the profile connected to your existing backups if you plan to restore them. Once setup is complete, connect to Wi-Fi and open Settings, then General, then Software Update. Install an available system update and follow the on-screen steps. Check Parts and Service History in Settings if it appears; its availability depends on the specific model and whether a component was replaced.
Checking for Activation Lock
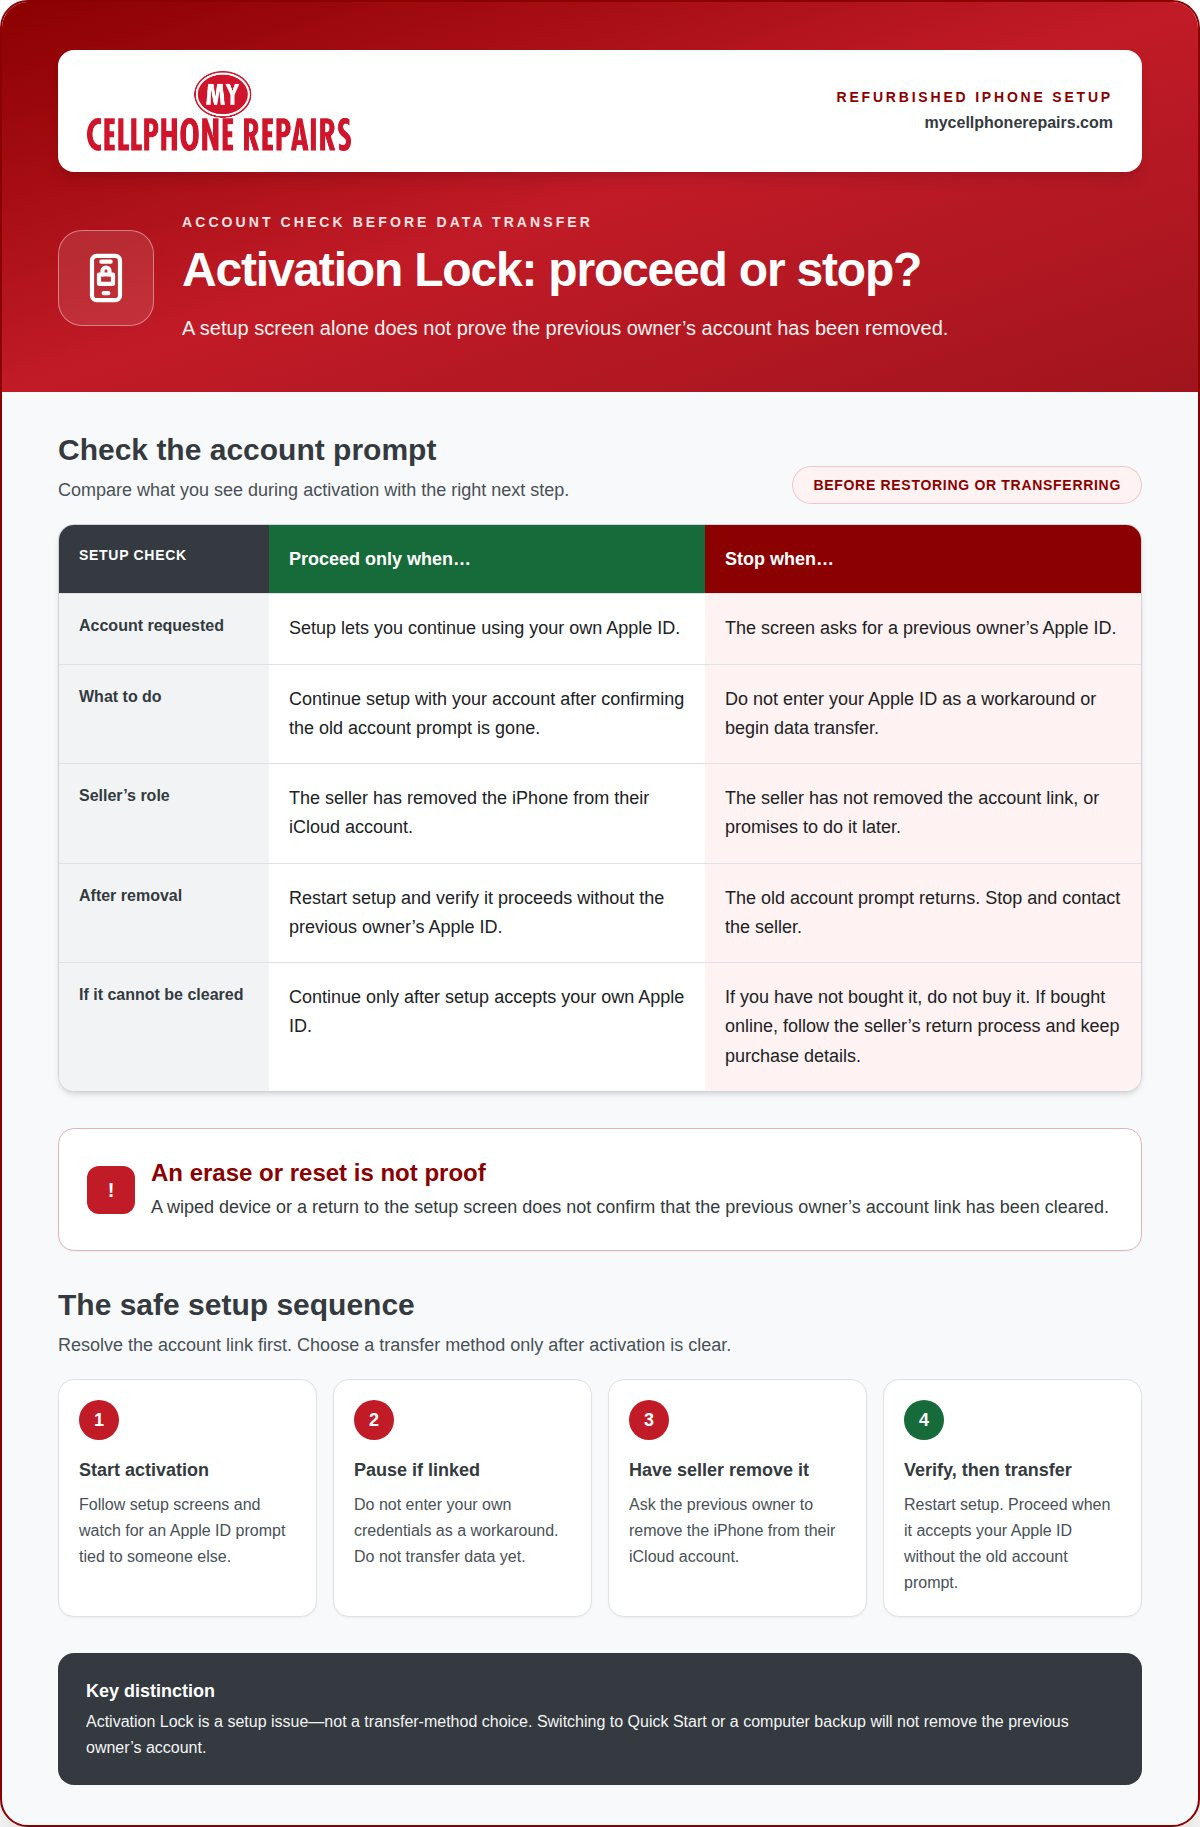
Check for Activation Lock during setup, before transferring data or relying on the refurbished iPhone. If setup requests a previous owner’s Apple ID, stop and resolve the lock first.
- Start the iPhone and follow its setup screens until activation. A properly refurbished device should arrive wiped, without Activation Lock, and with a clean installation of iOS. Continue only if the setup process lets you proceed using your own Apple ID. Reaching the setup screen alone doesn’t prove that the previous owner’s account has been removed. Watch for an Apple ID prompt tied to someone else.
- Read any account request carefully before entering credentials. If the screen asks for a previous owner’s Apple ID, the iPhone remains linked to that account. Don’t enter your Apple ID as a workaround or continue with data transfer. Your account won’t remove the previous owner’s Activation Lock. Stop setup to avoid moving information onto a device you can’t activate.
- Ask the seller to remove the iPhone from their iCloud account before setting it up under your account. After they remove it, restart setup and confirm you can proceed without the old Apple ID. Don’t treat a promise to address the lock later as successful activation. Make sure setup works with your own account.
- If the seller can’t remove Activation Lock, don’t buy the pre-owned iPhone. A device linked to someone else’s Apple ID cannot be set up as yours. If you already bought it online, follow the seller’s return process and keep your purchase details. An erased screen or reset does not prove the account link has been cleared.
- Check Activation Lock before restoring a backup or transferring data from another phone. This is a setup issue, not a transfer-method choice: switching from Quick Start to a computer backup won’t remove the previous owner’s account. Once setup accepts your Apple ID without requesting someone else’s, continue with your chosen method. If the old account prompt returns, stop and contact the seller.
Setting up Face ID or Touch ID and a passcode
- Create a passcode when prompted during setup. Choose one you can remember, but avoid obvious patterns such as repeated digits or a birth year. A passcode protects access when Face ID or Touch ID isn’t available and provides another way to unlock the phone if biometric recognition fails. Enter it again to confirm.
Keep your passcode private and don’t store it beside the iPhone. If you forget it, you may lose access and need to erase the device before setting it up again. Choose carefully before continuing.
- Check which biometric option your model supports. Face ID is supported on iPhone X and later models; other compatible iPhones may offer Touch ID. During setup, follow the prompts to enroll the available option. If you skip enrollment, open Settings later and choose Face ID & Passcode or Touch ID & Passcode.
Use the option shown on your iPhone. A model that uses Face ID won’t offer Touch ID, and a model without the required hardware won’t offer Face ID. The available menu shows which setup applies.
- For Face ID, hold the iPhone in front of your face and follow the on-screen enrollment instructions. Keep your face visible and move as prompted. For Touch ID, place a finger on the sensor when asked, lifting and resting it as directed. Complete enrollment before testing the sensor.
For Touch ID, choose a finger you naturally use to hold or unlock the device, and keep the sensor clean and dry during enrollment. For Face ID, adjust your grip if your hand or case blocks the camera area.
- After setup, test your passcode and enrolled biometric option. Lock the screen, wake the iPhone, then try Face ID or Touch ID. If recognition fails, enter your passcode and try again with your face or finger positioned as during enrollment. A successful passcode unlock gives you a fallback while troubleshooting.
If the iPhone repeatedly fails to recognize you, revisit the Face ID or Touch ID settings and follow the enrollment prompts again. Don’t remove the passcode to solve a recognition problem. Keep a working passcode while adjusting biometric access.
- Review passcode and biometric controls in Settings before storing sensitive information. Check that the iPhone locks when you press the side button, then confirm your selected unlock method works. If you share the device, remember that anyone who knows the passcode may access it. Share the code only with people you trust.
Using Quick Start for iPhone-to-iPhone transfer
Quick Start can copy settings from an old iPhone to the refurbished one. Both devices must run iOS 12.4 or later and have Wi-Fi and Bluetooth connected.
- Check that both iPhones meet Quick Start’s requirements before beginning. On each device, confirm its iOS version is 12.4 or later. Connect both phones to Wi-Fi and turn on Bluetooth. If either iPhone doesn’t meet these conditions, Quick Start won’t be the right direct-transfer method. Use a computer backup or another available setup option instead.
- Keep your old iPhone nearby and start setting up the refurbished iPhone. Follow the setup screens until you see the option to transfer from another iPhone. Quick Start can copy settings, or you can choose manual setup. Select direct iPhone transfer if you want to use the old phone as the source.
- Follow the prompts on both iPhones. Read each screen before tapping and respond on the device it identifies. Keep Wi-Fi and Bluetooth enabled during the process, as both are required for this transfer method. If your goal is to copy settings from the old iPhone, don’t switch to manual setup midway.
- Leave the two iPhones available while Quick Start works. Avoid restarting either phone or changing its network connection during the transfer. If a prompt appears on the old iPhone, complete it there; if the refurbished iPhone displays the next step, follow that screen. Let the devices proceed through their own prompts before moving on.
- Choose manual setup if you don’t want to copy settings directly from the old iPhone. You can continue configuring the refurbished device without using Quick Start. If you have an iPhone backup, a computer can restore it instead. Finder handles iPhone backups on macOS 10.15 or later, while iTunes applies on macOS 10.14 or earlier and PCs.
- After the transfer, review the refurbished iPhone before relying on it as your main device. Check that the settings you expected are present, then open key apps and confirm you can access them. Keep the old iPhone until you’ve checked what you need on the new one. If something is missing, compare your chosen transfer method with the backup options.
During your review, note that an iPhone part labeled “Genuine Apple Part” was replaced with a genuine Apple part using genuine Apple parts and processes. Using a nongenuine iPhone battery might lead to safety issues.
Checking carrier locks and blacklisting
Check the iPhone’s carrier status and IMEI before relying on it for calls or mobile data. If the device won’t activate, a carrier IMEI check can help identify a lock or blacklist.
- Find the IMEI in Settings under General, then About. Use it for a carrier IMEI check if activation fails or you need to investigate the phone’s status. Enter it accurately, since a typo can return a result for a different device. An IMEI check may identify a network issue, but it won’t remove a carrier lock.
- In Settings, open General, then About, and check the Carrier Lock field. “No SIM restrictions” means the iPhone is unlocked for use with any compatible carrier’s SIM. If a carrier name or restriction appears, treat it as carrier-locked. Powering on or connecting to Wi-Fi doesn’t confirm that it’s unlocked. Check its status before choosing a SIM.
- If the iPhone is carrier-locked, use a SIM from that carrier or have the device unlocked. A SIM from another carrier may not activate, even if it fits. A carrier lock limits which carrier’s SIM can work, while a blacklist can prevent network activation. These are separate issues that need different resolutions.
- If the iPhone won’t activate on a network, consider both a carrier lock and a blacklist. A carrier IMEI check can help identify the issue. Failed activation alone doesn’t show which one applies, so compare the result with the Carrier Lock setting. If Settings says “No SIM restrictions” but activation still fails, an IMEI check may help reveal whether blacklisting is involved.
- Resolve the phone’s status before relying on it for mobile service. For a carrier-locked iPhone, use its carrier’s SIM or have it unlocked. For a possible blacklist, switching SIMs may not help, as the device may still fail network activation. Retest activation after addressing the relevant issue. If you’re evaluating a refurbished iPhone, include network compatibility in your setup decision.
An unsuccessful network activation should therefore be treated as an unresolved status, not as proof of either cause. The iPhone may be locked to another carrier or blacklisted, and a carrier IMEI check can identify the issue. Keep that check focused on the activation problem rather than guessing from the failure alone. Until the issue is identified, do not assume that changing carriers will make the phone usable on a network; first establish whether the lock or blacklist explains why it will not activate.
My Cellphone Repairs: Refurbished iPhone Sales
My Cellphone Repairs sells refurbished iPhones for readers choosing a pre-owned device. Use the checks in this guide to assess storage, Activation Lock, carrier status, and transfer options before settling on a phone. If your current iPhone has a damaged screen, My Cellphone Repairs also offers iPhone Screen Repair.
After setup, monitor battery health and charging behavior. If the battery needs attention, consider Battery Replacement; a damaged screen may need repair before the phone is comfortable to use. Choose support that matches the issue rather than continuing with a device that doesn’t work as expected.
For help choosing a refurbished iPhone or addressing an iPhone repair need, contact My Cellphone Repairs.
Make Your iPhone Ready for What’s Next
Once your refurbished iPhone is set up, add it to your regular device routine. Keep your Apple ID details accessible, review storage as photos and apps accumulate, and install available iOS updates. A careful setup gives you a sound starting point; ongoing checks can help you notice changes in battery performance, charging, or screen response.
If a hardware issue gets in the way, My Cellphone Repairs offers iPhone Screen Repair, Samsung Phone Repair, and MacBook Repair. Choose support that matches your device and the problem, rather than ignoring damage that affects everyday use.
Ready to discuss your repair needs? Contact My Cellphone Repairs to take the next step with confidence.
Frequently Asked Questions
How do I see how much storage I have?
In Settings, tap General, then iPhone Storage to see the device’s capacity and used space. The screen also shows which apps and files take up the most room. If Photos uses a large share, review your library before restoring everything from an old phone. Check available space before downloading apps or moving large files so you can decide what to keep.
What about the SIM?
An iPhone needs an active SIM or eSIM for calls and mobile data. Insert a physical SIM supported by your carrier, or follow the carrier’s steps to activate an eSIM. Newer iPhone models can use an eSIM activated through the carrier. Wi-Fi provides internet access without cellular service, but it doesn’t replace cellular calls or mobile data when you’re away from Wi-Fi.
How to set up a refurbished iPhone step by step
Setting up a new refurbished iPhone starts with inspecting the device and confirming setup doesn’t request a previous owner’s Apple ID. Connect to Wi-Fi, choose a transfer or restore method, and sign in with your Apple ID. Create a passcode and configure the biometric option available on your model. After reaching the Home Screen, review storage, battery health, and available iOS updates before installing your everyday apps.
How to confirm a refurbished iPhone is unlocked and compatible with a U.S. carrier
Open Settings, tap General, then About, and look for “No SIM restrictions” beside Carrier Lock. That indicates the iPhone is unlocked for use with any compatible carrier’s SIM. Compatibility also depends on the carrier’s network and successful activation. If activation fails, a carrier IMEI check can help identify a carrier lock or blacklist. A SIM that physically fits doesn’t by itself confirm compatibility.
How to transfer data from an old iPhone or Android phone to a refurbished iPhone
If you’re setting up a new refurbished iPhone from an old iPhone, Quick Start can transfer data directly when both phones run iOS 12.4 or later and have Wi-Fi and Bluetooth enabled. You can also restore an iPhone backup using Finder on macOS 10.15 or later, or iTunes on macOS 10.14 or earlier and PCs. From Android, choose Move to iOS during setup and follow its prompts.
Get it fixed at My Cellphone Repairs: most repairs are done the same day. Walk in or book online.
Book NowPhone frozen or acting up? See our step-by-step restart & reset guides →
Our locations
- Towson Mall825 Dulaney Valley Rd, Second Level, Towson, MD 21204
(410) 828-4404 - Grand Rapids3077 28th St SE, Grand Rapids, MI 49512
(616) 799-6996 - PG Plaza Mall (Hyattsville)3500 East-West Hwy, Mall at Prince George's, Target Entrance, Hyattsville, MD 20782
(301) 559-1105 - Bowie Town Center15630 Emerald Way, Bowie, MD 20716
(240) 614-3600 - Capital City Mall (Camp Hill / Harrisburg area)3604 Capital City Mall Dr, Camp Hill, PA 17011
(717) 919-7868 - Cumberland Mall (Vineland)3849 S Delsea Dr, next to Boost Mobile, Dick's Sporting Goods entrance, Vineland, NJ 08360
(856) 765-5049 - Mondawmin Mall2401 Liberty Heights Ave, Lower Level, Baltimore, MD 21215
(443) 826-7711 - Baltimore Inner Harbor100 East Pratt St, Suite 101, Baltimore, MD 21202
(443) 838-8989 - St Charles Mall (Waldorf)11110 Mall Cir, Waldorf, MD 20603
(301) 645-7755 - Alexandria7650 Richmond Hwy, Alexandria, VA 22306
(703) 341-6789